Looking to create your own custom MIDI kit using Logic Pro X in just a few minutes? You are in the right place. All you’ll need is Logic Pro X, some drum samples and a MIDI controller.
The ability to create custom MIDI drum kits unlocks endless possibilities and sounds for your music production. In just a few steps you’ll be able to drag and drop any drum sample straight into Logic and start building a custom kit for your beats.
Step 1: Choose Your Drum Samples
The first step to creating your own MIDI drum kit is choosing the right drum samples for your project. There are many resources for finding drum samples including free and paid options as well as recording your own samples.
If you are looking for professional sounding samples that won’t break the bank, Yurt Rock has the answer. We’ve partnered with some of the world’s greatest drummers including Clyde Stubblefield, Mike Clark, Daru Jones and many more drum legends to produce High Quality 24 Bit 48 KHZ WAV audio samples.
Ever wanted to drag and drop the industry’s most respected drummers into your own productions? Now you can.
If you really want to get creative with your custom kit, mix and match samples from different artists and create the ultimate drum kit.
Here are a few popular samples other musicians are enjoying:
For our kit in today’s example, we are going to use Yurt Rock’s Dry Drum Kit samples linked above. This will allow us to add our own creative touch and effects if we so choose.
Step 2: Logic Pro X Set Up
Once you’ve downloaded your drum samples, open up a new logic pro session and connect your MIDI controller if you are using one.
Create a new software instrument track and select Electronic Drum Kit→ Empty Kit from the Logic Library.

Navigate to your track’s channel strip in the Logic Mixer and select the DMD input setting.

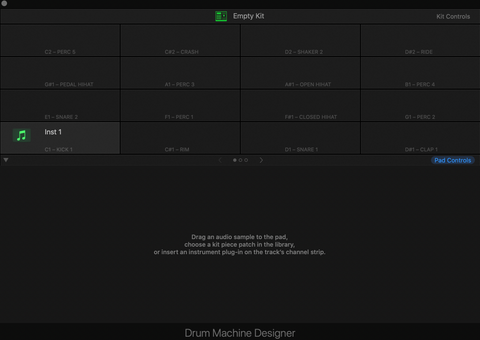
The Logic Drum Machine Designer window will then open and you are ready to create your custom MIDI kit.

Step 3: Create Your MIDI Kit
All you need to do now is drag and drop your sample files into the appropriate trigger.
You’ll notice within the Drum Machine Designer each trigger is labeled C1, C#1, D1, etc.
As you can probably guess, if you drag a sample into the C1 trigger, your C1 key on your MIDI keyboard or controller will play the corresponding sample. This is a great feature as it lets you create the most comfortable layout on your MIDI controller.
Here is a simple configuration to help you get started:
C1: Kick sample
D1: Snare 1
E1: Snare 2
F1: Hi Hat Closed
G1: Hi Hat Open

Congratulations! You’ve just created your own custom MIDI kit using drum samples. Happy producing and have fun expanding your kit.
Let us know if you have additional questions in the comments below and be sure to tag #yurtrock on social media to be featured in one of our Instagram stories!

